Bitcoin mining heater: How to silence the thing!
This is the final post in a series on setting up using a bitcoin miner to heat my Nana's house.
The biggest challenge with all the setup of heating my Nana’s house with bitcoin mining was the noise.
The machine draws 3.3kW!
Yet it needs to stay at preferably less than 70 degrees (Even that is higher than ideal).
To dissipate all that energy you need a lot of air. Moving all that air over the relatively small volume of the miner is going to be loud. There isn’t a way around that.
The original fans on the device lead to it running at over 90 decibels. That’s like having a strimmer in your dining room. (If you think that’s desirable, read that sentence again)
The guy I bought the device off of also sold what he called mufflers, but which is effectively just a big fan designed to disturb the air as little as possible. This lowers the pitch of the noise due to the fan and is a great improvement in comparison to getting the volume down to under 70dB.
That’s a great reduction but not anywhere near enough to be permissible. This is where the complexity came in. Normally when soundproofing you need to cover any air gaps to stop the air from passing the noise through.
The problem is, I need the airflow to be constant and large. That lead to the design of trying to make the noise travel as far as possible before it gets to the room. This is why there are two towers as can be seen from this image from my original post.
The air goes in the left tower up and over an internal divider, back down the left tower, through the machine, up the right tower, over a divider, back down the right tower and out.

All I could do was hope this would be enough from the perspective of it being a long enough path.
The inside of the towers was covered in glued-on tetrahedral covered foam. The idea is that this would help reduce the bouncing of the sound around while traversing the path.
It didn’t really work.
Apart from looking horrible, the blue panels are supposed to add more soundproofing despite their ghastly appearance, the whole thing remained at around 60 dB. This meant my Nana didn’t feel she could have anyone over and certainly couldn’t use the dining room as a dining room.
The weeks went by and I didn’t find time to come back up and finish the project.
The weather got colder getting down to sub-zero temperatures. The dining room stayed warm if unhabitable due to the noise. The extremities of the house were starting to get cold. The bathroom got down to 13 Celcius.
Despite my advice that if she was too cold she was to turn the heating on the struggle of too much heat (the dining room could hit 27 if she didn’t open the windows) and not enough heat (at 13 degrees you really don’t want to go to the bathroom) compounded with the noise and I was asked to remove the device.
There were a number of failings on my part which lead to that email requesting the end of the project. I’d left it too long and hadn’t given her a date for when I was going to finish it. I hadn’t taken into account the family politics involved and how other family members might feel I’m swindling my Nana with this bitcoin get rich quick scheme (I will actually barely break even).
I also could have done a better job of informing my nana on how to keep the house at the right temperature.
The compromise
By the end of the week, I had with the help of my parents got to a compromise that I would spend the following week working from hers and in the evenings working on the sound isolation for the heater. My Dad would provide some facing to cover the ugly soundproofing and allow the device to look more in keeping with the cottage.
Luckily my girlfriend’s father was fixing up a new sound studio and after helping him with it he offered to lend me the offcuts he would otherwise be throwing away.
With these and brute determination to make it work, I reinforced every section focusing first on the box containing the miner which as you can see became mightly insulated.

One question I got a lot while doing this from interested family and friends was about all this extra insulation causing the heat to build up. “Not to worry,” I told them. All of the heat dissipation is coming from the volume of air traversing through the device. If it relied on the passive cooling through the box it would melt in less than an hour extra insulation or not.
The sides also needed to be bulked up. I realised that most of the sound was coming through the divider panels and not over the top with the airflow. Out through the red paths (through panels) in the following diagram, and not the green paths (Which were physically clear of pannels).
To fix this I added a lot of Rockwool so that on all sides so there was weighty insulation.


At this point, I had done it. The sound was down to the 40dB range.
It had taken working from 6 pm till midnight every day of that week but the volume was down.
The only thing left was the aesthetic.
That was arranged to be done the following weekend.

The following weekend
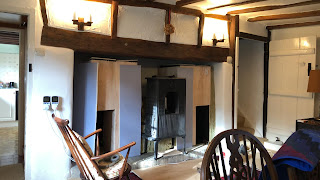
The following weekend we had a go at creating the facing for it. My Dad has his company cut some facing and we set about putting it up. The only issue, there was a misunderstanding in the order and we ended up with two left sides rather than a left and a right side.
It's not too obvious from the following photo but the right side has a cut where I'd had to move the bottom piece from being right-handed to left-handed.
The left inside piece is also back to front, showing a plane greenish side rather than the textured off white of the front panels.

The next weekend
The following weekend was the final weekend required to get this project in a good state.
We had the right wood recut and it fit perfectly, after a quick lick of paint it looked beautiful. As one neighbour has commented, "It looks as if it's always been there".
 |
| Prepaint |
 |
| Post paint |


dscds
ReplyDelete